Building a custom Artillery engine
We designed Artillery to be easy to extend and customize through a variety of extension APIs. Artillery comes with batteries included and many out-of-the-box integrations, but every non-trivial load testing project will require at least some customization at some point.
Artillery can be extended and customized in several different ways:
- You can customize the behavior of VUs with custom JS code (using any
npmmodule) for example to generate some data on-the-fly, or make a call to an external system. - There’s an API to record custom metrics to keep track of things that are specific to your system. For example a load test on a headless ecommerce API may track the number of products added to cart as a custom metric, or record the duration of several related transactions as one value.
- Both custom VU behavior and tracking custom metrics may be packaged as an Artillery plugin to make them easier to reuse across different tests. Plugins are also often used for sending Artillery test data to external systems.
- And finally, Artillery can be extended through its engine API to add support for a new protocol, or to provide an application-specific interface to make it easier to write tests. This guide will walk you through writing a custom engine for Artillery, using our new PostHog engine as an example.
When to create a custom engine?
There are two main use-cases for creating a new engine:
- Add support for a new protocol, e.g. extend Artillery with support gRPC
- Make an application or system easier to test with an engine that exposes higher-level app-specific actions
Adding support for a new protocol
You may already be familiar with the built-in HTTP engine, that provides support for get, post, put, and other HTTP actions. The built-in Socket.IO provides emit action to test Socket.IO systems, and the WebSocket engine provides WebSocket-specific connect and send actions. That’s the first use-case for writing a new engine: adding support for a new protocol.
Application-specific engine
The other use-case is providing a higher-level abstraction while interacting with more complex systems. One example of this is our AWS Kinesis Engine which provides support for the putRecord operation on Kinesis data streams. The underlying protocol used for Kinesis operations is HTTP, so you could load test a Kinesis stream using a series of HTTP POST requests with JSON payloads, it’s much easier to do it through a Kinesis-specific interface that any user of Kinesis is already familiar with.
Let’s create a PostHog engine
PostHog is an open-source product analytics platform (we are big fans of it here at Artillery). In the rest of this guide we will build a custom engine for interacting with PostHog via posthog-node, while providing a simple method that can be replicated for other projects.
If you just want to test your PostHog instance, the final product of this article can be found at artilleryio/artillery-engine-posthog .

Let’s get started!
Getting to know a simple custom engine
A super simple version of an engine can be found in the examples folder in our repo. Let’s get familiar with it first and then use it to build our PostHog engine.
First, let’s clone the repo and have a look at examples/artillery-engine-example/example.yaml: (→ jump to code )
config:
  target: 'system-under-test-endpoint'
  example: # (1)
    mandatoryString: 'script wide prop loaded at startup'
  phases:
    - arrivalRate: 1
      duration: 1
  engines: # (1)
    example: {}
scenarios:
  - name: 'example engine scenario'
    engine: example # (3)
    flow:
      - doSomething: # (4)
          id: 123
      - doSomething:
          id: 456
Here we have a simple script that creates a single virtual user, and one scenario that uses our example engine.
- We tell Artillery to load the engine by adding it to
config.enginesin (1) - We set engine-specific configuration properties in (2)
- We enable the engine in our scenario by setting
engine: examplein (3) - We’re using a custom action provided by our engine called
doSomethingin our scenario
Setting up & running a test
Let’s try to run our test. The following steps mimic the steps you’d need to take whilst developing an engine. we’ll run all of the following commands from inside the examples/artillery-engine-example directory:
- Install our engine’s dependencies with
npm install - Set up parent folder as
NODE_PATHso that this engine can be found and loaded by Artillery:export NODE_PATH=$(pwd)/..- The
NODE_PATHenvironment variable is used by Node.js to locate modules at runtime. See the official documentation forNODE_PATHfor details.
- The
- Enable
DEBUGmode so we can see debug messages:DEBUG=engine:example artillery run example.yaml- Our example engine prints messages at debug level, setting the DEBUG flag this way will let us see messages printed only by our engine (this will come handy when developing)
Running DEBUG=engine:example artillery run example.yaml nets us the following output:
Phase started: unnamed (index: 0, duration: 1s) 20:37:06(+0000)

doSomething action with id: 123
Phase completed: unnamed (index: 0, duration: 1s) 20:37:07(+0000)

target is: system-under-test-endpoint
doSomething action with id: 456
target is: system-under-test-endpoint
--------------------------------------
Metrics for period to: 20:37:10(+0000) (width: 0.002s)
--------------------------------------

example.action_count: .......................................................... 2
vusers.completed: .............................................................. 1
vusers.created: ................................................................ 1
vusers.created_by_name.A scenario using the custom 'example' engine: ........... 1
vusers.failed: ................................................................. 0
vusers.session_length:
  min: ......................................................................... 2.3
  max: ......................................................................... 2.3
  median: ...................................................................... 2.3
  p95: ......................................................................... 2.3
  p99: ......................................................................... 2.3


All VUs finished. Total time: 2 seconds

--------------------------------
Summary report @ 20:37:09(+0000)
--------------------------------

example.action_count: .......................................................... 2
vusers.completed: .............................................................. 1
vusers.created: ................................................................ 1
vusers.created_by_name.A scenario using the custom 'example' engine: ........... 1
vusers.failed: ................................................................. 0
vusers.session_length:
  min: ......................................................................... 2.3
  max: ......................................................................... 2.3
  median: ...................................................................... 2.3
  p95: ......................................................................... 2.3
  p99: ......................................................................... 2.3
From the output, we can see that our test created a single virtual user, which ran the scenario with two doSomething actions. Each of those actions printed its arguments, and also recorded a counter metric with Artillery’s custom metrics API.
Anatomy of an Artillery engine
An Artillery engine is a Node.js package, that exports a class that implements the engine. The package’s name must start with artillery-engine-, as Artillery relies on that to discover and load the engines at runtime.
The constructor of the class that implements the engine receives 3 arguments:
script- this is the entirety of the test script, including theconfigsection and all scenariosevents- this in anEventEmitterthat the engine implementation can use to communicate with Artillery- The engine must emit a
'started'event when a VU starts running - The engine may emit events to track custom metrics
- The engine must emit a
helpers- this is a collection of helper utility functions that are commonly used by engines
After Artillery initializes an engine, it will call the createScenario() method on an instance of the engine. This method is called once for each scenario in the test that uses this engine. The createScenario() function is expected to return a VU function, i.e. a function that runs the scenario. Artillery will invoke this function for each VU it creates. This function receives two arguments:
context- the initial context for the VU. This is an object with data unique to this VU and not shared with any other VUs.callback- a callback function that signals that the VU is finished running its scenario
Building the PostHog engine
Knowing all this, we can now start working on our PostHog engine. As custom engines allow us to leverage existing npm packages we’ll use posthog-node package to interact with PostHog.
Checking the documentation here , we can see we are going to need a few things:
- A way for the user to provide an API key to authenticate with their PostHog instance
- Support for the following actions:
capture: send an event to our PostHog instanceidentify: add metadata to an existing useralias: merge multiple distinct ids
A script testing PostHog would then look like this:
config:
  target: 'https://my-posthog-instance.dev'
  posthog:
    apiKey: '{{ $env.POSTHOG_API_KEY }}' # mandatory
  phases:
    - arrivalCount: 1
      duration: 1
  engines:
    posthog: {} # let’s call our engine posthog
scenarios:
  - name: 'posthog engine test'
    engine: posthog
    flow:
      - count: 3
        loop:
          - capture:
              distinctId: 'distinct id'
              event: 'movie played'
              properties:
                movieId: 'Die Hard'
                category: 'Christmas'
                $set:
                  userProperty: 'value'
          - identify:
              distinctId: 'distinct id'
              properties:
                email: 'john@mcclane.com'
                bareFoot: true
          - alias:
              distinctId: 'distinct id'
              alias: 'Cowboy'
          - think: 2
The scenario is a mix of PostHog-specific actions (capture, identify and alias) and generic Artillery actions (loop and think).
Implementing PostHog support
Now, onto the logic of the engine. We won’t go through the entire file line by line, but instead highlight PostHog-specific parts.
- Install
posthog-nodewithnpm install --save posthog-node - Change the
exampleengine name toposthoginindex.js(andpackage.json) - Update
index.jsto initialize a new PostHog client on setup, and fail if we are missing an API key (→ jump to code )
constructor(script, ee, helpers) {
  this.script = script;
  this.ee = ee;
  this.helpers = helpers;
  this.target = script.config.target;

  this.apiKey = this.script.config?.posthog?.apiKey;

  if (!this.apiKey) {
    throw new Error('no PostHog API key provided');
  }

  return this;
}- Initialize a PostHog client when a VU starts running its scenario (→ jump to code )
    return function scenario(initialContext, callback) {
      const init = function init(next) {
        initialContext.postHogClient = new PostHog(self.apiKey, {
          flushInterval: 100,
          host: self.target
        });

        ee.emit('started');
        return next(null, initialContext);
      };
- Add PostHog-specific action handlers such as
capture: (→ jump to code )
if (rs.capture) {
  return function capture(context, callback) {
    const params = {
      distinctId: self.helpers.template(rs.capture.distinctId, context, true),
      event: self.helpers.template(rs.capture.event, context, true),
      properties: self.helpers.template(rs.capture.properties, context, true),
    };
    debug(params);
    context.postHogClient.capture(params);
    ee.emit('counter', 'engine.posthog.capture', 1);
    ee.emit('rate', 'engine.posthog.capture_rate');
    return callback(null, context);
  };
}
Artillery provides a set of helper functions which we’re using via self.helpers.template to template the values we got from the script. We’re also implementing support for common scenario actions such as think and loop in another section of the code.
Result
After all this, we can run this case like this (DEBUG is not needed but provides a bit more of context, so we know everything works well):
DEBUG=engine:posthog POSTHOG_API_KEY=MY_POSTHOG_API_KEY artillery run script.yamlAnd we get:
- Our payloads properly printed:
...
{
  identify: {
    distinctId: 'distinct id',
    properties: { email: 'john@mcclane.com', bareFoot: true }
  }
}
{
  alias: {
    distinctId: 'distinct id',
    alias: 'Cowboy'
  }
}
{
  capture: {
    distinctId: 'distinct id',
    event: 'movie played',
    properties: { movieId: 'Die Hard', category: 'Christmas', '$set': [Object] }
  }
}
...
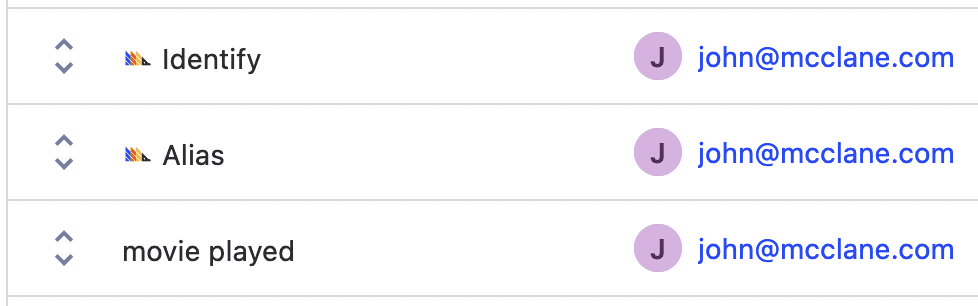
- Events on posthog dashboard:
Publishing the engine
Once you’re happy that everything works, you can publish your new engine to npm and GitHub. Please see the official npm guide for publishing new packages ›
Summary
We have successfully managed to implement a PostHog engine. It does much more than simply send events, it allows us to write tests in the same way we interact with the system.
This is valuable because it allows us to test something the same way it’s being used, and abstract use cases while doing the heavy lifting engine-side. Leading us to simpler scripts which are easier to understand.
You can see the fully functional PostHog engine at https://github.com/artilleryio/artillery/tree/main/packages/artillery-engine-posthog . The repo includes a sample script that generates random data to send to a PostHog instance, which should be a good starting point for your own tests.
Happy load testing!